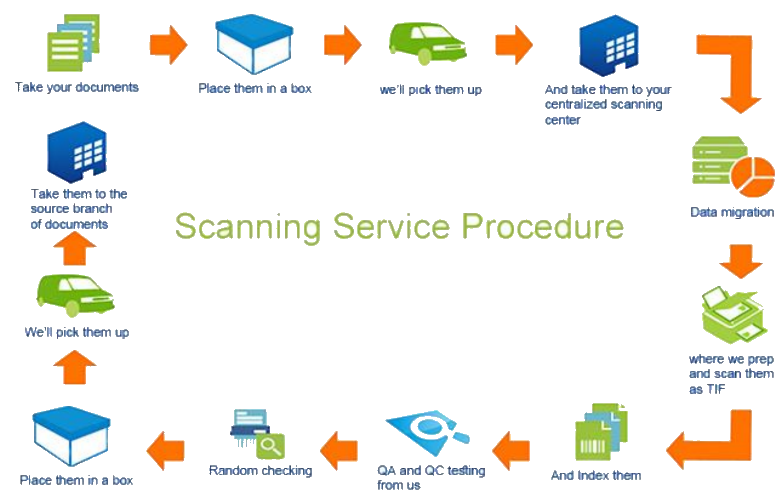
Scanning Service Procedure
A mobilization period will be around 3 weeks after the project award.
The following Points are to be completed during the mobilization period:
- Organize meetings to discuss the requirements of the project.
- Prepare a centralized archiving center.
- Install hardware requirements of the project.
- Implement software requirements of the project.
- Start the testing phase of the project.
Handling of images: images will be received from an authorized person in image stores based on an agreed-upon list
which should be signed by both parties.
The following Points must be taken into consideration during receiving Files:
- During the Receiving process, Autographics® will prepare a specific form to fill and
sign by both parties: BWA and Autographics® Company, This form will have
important information about the number of received boxes and documents.
- The previous Signed Forms will be saved.
- The quality assurance procedure depends on signed forms to make sure
that all received pages and documents are archived.
- The data of the form will be printed.
A. Dispatching
- After receiving the Files from the branch, based on the type of
Files and type of Sections and the size of Pages in each file are.
dispatched to the scanning operators.
- The rules of the dispatching process are dependent on the
document analysis data that shall be submitted to us before the
start of the project.
- Dispatching rules are operational rules that might be subjected to
change by the project operations manager in order to achieve
maximum productivity of both the scanners and the people.
B. Preparing Documents for Scanning
When using an ADF scanner, preparing the documents is probably the most important step before scanning.Be
sure to remove all staples and fasteners /Staples can disrupt scanning by jamming the roller system and can create strange
images on your scans. Take them out with a staple remover. If you’re really picky, you can cover the patch up the holes with
clear tape. And it might sound obvious but go through the paper and remove all paper clips.
Smooth out all corners
To prevent the omission of key material from the documents and in the interest of preventing misfeeds, be sure to smooth
the corners of all documents.
Align pages the same way
To save time on editing images after scanning, be sure all pages are facing the same way and none are upside-down. It’s
much quicker to do it now than to adjust the scans later.
Be sure all editing marks are dry
If the documents have been marked with a marker or white correction fluid, be sure they have COMPLETELY dried before
scanning. If not, they could smudge the lenses, creating streaky scans and poor image quality.
Fan out documents
Fanning the paper gently will make for smoother scanning. After fans, be sure to tap the documents lightly on a flat
surface to align them before loading.
These can be scanned to any specifications you require:
- 200 DPI to 600 DPI
- Colour
- Black-and-white
- Gray Scale
- Readable percentage of output images depends on the original page.
The images can be delivered in any format you require such as
- Tiff
- JPEG
- PDF
- Searchable text
Based on the analysis phase, the BWA team, and Autographics® team will migrate data from the X7 database to VisionFile
(DMS) database as mentioned in tender papers, these indexes will use for retrieving the captured documents.
These indexes must build within the implementation stage.
The indexing operation consists of the following :
- Pick Data from the document.
- Enter the data that has already been picked.
- Re-group Documents into Sections.
- Re-attach Sections into Files
Quality control consists of four tasks, these are:
Check the number of Pages for each document
• we will check the number of scanned images in each electronic document and compare
it with the number of Pages in the hard folders.
• Autographics® will prepare a report with all comments
Check the number of Pages for each document
• This stage consists of checking for filling all needed Indexes
Check the completeness of the data
• This Stage consists of checking if the entered data is correct or not
Check the correctness of the data
• Saved images are revised to ensure the quality of scanning
After having completed the Autographics® quality control process, the BWA is required to approve both the data entered
and the quality of scanning.
The process works as follows:
• After Autographics® Quality control of each file, it is flagged as Self Quality Controlled.
• Using the application, everyday BWA QA team lists Files that have been finished by Autographics® QA team to start
Quality Control processing and revising them.
• BWA flags Approved Files as approved.
• BWA shows any mistakes to be corrected.
• BWA agrees and commits that any Files that are not flagged as approved or
rejected for two business days will be considered automatically approved.
• Rejected Files are returned back to Autographics® Quality Control for mending rejection reasons.
• After finishing Quality Control processing approved files will return to the source branch.